Saturday, 28 March 2015

Trio of Truffles


I have spent this week experimenting with different foods - creating recipes that I can still eat, while I am on my anti-inflammatory month. I want to be able to show you that the food you eat isn't just beneficial for your health, as well as still being exciting and delicious.
 Nearly every one of us has a sweet tooth and even though we know its not the best for us, we will still eat it anyway. So I 
have been experimenting all week perfecting these truffles - so that we can eat something tasty and feel no guilt. I managed to come up with three different flavours, so you can either make all of them or pick your favourite! They are Chocolate Orange, Salted Chocolate Caramel and Berry Flavour.
They are incredibly easy and quick to make - not only are they gluten and dairy free but also refined sugar and raw! (Meaning no cooking is needed!)

Own Photo


You will need:

(Food Processor)

The Base to all the Truffles -
One Cup of Pitted Dates
Two Cups of Cashews Nuts

Chocolate Orange -
Two Tablespoons of Raw Cacao Powder
Half a Peel of a fresh Orange

Desiccated Coconut for Covering (Optional)

Salted Caramel -

One Tablespoon of Maple Syrup
Two Tablespoons of Raw Cacao Powder
One Teaspoon of Vanilla Essence
Sprinkling of Salt (Pink Himalayan)

85%/90% Dark Chocolate to Melt or Raw Cacao Powder for Covering (Optional) 

Berry -
1/2 Cup of Cranberries/Raisins

Pistachio Crumbs for Covering 


Truffles - Own Photo


Put the dates into a bowl and cover with boiling water so that they soak to become softer. While the dates are soaking, add the cashews into the food processor and blitz until they create a fine crumb. Add the dates into the food processor and blitz again until a soft mixture forms. You may need to add some of the date water in with the mixture so that it loosens up a bit and mixes more easily.
Then put the mixture into a mixing bowl and add in the ingredients for whatever the flavour you want to make. Stir everything together until all the ingredients are combined. Wrap the mixture in a ball in some cling film and pop into the fridge for 30 minutes. This will harden the mixture making it easier to create the truffle ball shape. 


Making Truffles - Own Photo


Bring the mixture out of the fridge and roll them into small balls. On a plate roll the balls in your desired coating - cacao powder, desiccated coconut, pistachio crumbs or dip in dark chocolate! The ones which are on the recipe are what I believe works best flavour-wise but you can always mix them up a bit!

Pop back into the fridge and they are ready to consume whenever! 


Salted Caramel Chocolate - Own Photo

I also had some of the ingredients left over so instead of wasting them - I stuffed some of the dates with nut butter and dipped them in chocolate. I then rolled them in some pistachio crumb! - They are a delicious snack!

Chocolate covered nut butter stuffed dates- Own Photo

Enjoy!

MB

X

Friday, 27 March 2015

'The Autoimmune Solution'


The first week of my anti-inflammatory month is over, and actually it has been really enjoyable and also really very positive. I have been experimenting with different recipes throughout the week, coming up with some really tasty, healthy and beneficial foods! 
The 'anti-inflammatory month' that I have decided to take part in means that I am not eating any gluten or dairy. Also no nightshade foods, such as - peppers, tomatoes, aubergine, white potatoes, chilli, paprika - (yes this means no ketchup too!) I will also be cutting out any legumes, grains, starch, caffeine and alcohol - after receiving a brilliant book that Edd got me called the "The Autoimmune Solution". I am really engrossed in this book. It is extremely reassuring and interesting to read something which I can relate to, and, something which makes so much sense to me. I highly recommend if you are suffering from any auto-immune disease to invest in this book - whether you have arthritis, coeliac, Graves disease, lupus, Crohn's disease, psoriasis etc, it is very worthwhile. 


Own Photo: Amy Myers - The Autoimmune Solution.


Also I have done a lot of research this week into gluten and the effect it has on your gut, whether you have an autoimmune disease or not. A gluten-free diet is beneficial for you in so many ways. If you have unknown symptoms  such as pains, aches, stomach cramps, bloating, upset tummy or even just feeling groggy and tired all the time - try to: cut out gluten.
Take action yourself - I have never been officially diagnosed as a coeliac but I know that I have a gluten-sensitivity. Five years ago I started to cut out gluten and I wish I had done it sooner - as there might of been less chance of me developing rheumatoid arthritis. I know that most people can't see themselves having a life without gluten - but then, I can't see myself living my life to its healthiest and fullest with gluten in it. You know your body better than anyone else, so you'll know what is working for you and what isn't.
I also had one of my routine arthritis check-ups on Thursday at Nuffield Oxford, with a really positive doctor. She had no worries about my arthritis spreading and said that it is under control - this is a massive relief for me, after all the hard work I have put in over the last couple of months. Instead of injecting steroids into my joints, she decided a more natural approach of hand therapy would be helpful. It is also the first time a doctor (out of the 4/5 doctors I've seen) who said - 'Well yes, it would make sense to cut out gluten as coeliac is also an auto-immune disease.' Finally someone admitting to me that there is some kind of relationship between arthritis and gluten. Even though I knew this myself, it was good to have some clarification rather than the past doctors, who have looked at me with the same bemused expression - why would gluten effect your inflammation? why would diet help you with your pain? There is no scientific proof of this. - Well no, there isn't. But if I waited around for the scientific research and proof to come out - I would be waiting for a very long, and, very painful time.
 Like I said, you know your body better than anyone else. For me, I know that certain foods, stress, activities not only give me a flare up in my joints but also in my gut. I know what does and doesn't affect me.
I have always said that, I am not a doctor, I am not a nutritionist nor do I have any medical degree. The way I deal with my autoimmune disease is purely based on my own experiences. 
 It is a struggle, living with a disease where your own immune system is attacking itself - where it seems as if your own body has turned against you, it is hard to know where, who and what to to do. And I can fully relate to that.
So if you are willing to try and experiment with a different approach, I fully recommend looking into other ways of helping your autoimmune disease - whether it is researching online, taking a read of 'The Autoimmune Solution" book or even just a quick skim through my blog, do it! 
You are the person who can help yourself most. 

Ryan Gosling + Gluten 

(Sorry if this has been a bit of a tedious post to read - this weekend I will be posting up my truffle recipe for 3 different flavours - which is both gluten, dairy and guilt free plus really delicious!)


MB

X

Also email me here or Facebook me if you have any questions -


Monday, 23 March 2015

Coco-Orange Protein Balls


Recently I have really found my sweet tooth, especially with the combination of dates and peanut-butter. But I have admitted to myself that I am in fact, a peanut-butter addict, and I need to cut down on how many jars I get through a week....
I also love dates, I eat them like they are healthy little toffee's. They are high in fibre, so help towards maintaining a healthy gut, as well as minerals like calcium, iron and magnesium! These coco-orange protein balls are inspired by 'NKD' bars, which are the snack I turn to when I need a pick me up. (My favourite flavour is cocoa orange.) Being a student, these get a little pricey to buy so I decided it was time to try make my own! I know they may not look that impressive, but they really are one of the tastiest things that I have made recently!


www.instagram.com/mollybuszard


You will need -

Makes 6/8

One cup of Dates
One and 1/2 Cup of Cashew Nuts
Two Tablespoons of Raw Cacao Powder
Peel of Half an Fresh Orange
Optional - One Scoop of Protein Powder (I used Vegan Blend from MyProtein)
Sprinkle of Salt
Desiccated Coconut for Rolling


Soak the dates in a bowl of boiling water so that they become soft and sticky, this should only take a few minutes. Then in a food processor, blitz the cashews to create a find crumb. Next add the dates in and mix until a smooth mixture forms. In a mixing bowl add the date/cashew mixture as well as the cacao powder, orange peel, protein powder and salt and stir all the ingredients through.
Line a tray with cling film and roll the mixture into small balls - pop into the fridge for 30 minutes. Once they have hardened slightly, roll the balls in desiccated coconut so that they are evenly covered. Then put them back into the fridge, or consume immediately. 


Enjoy!

MB

X

Friday, 20 March 2015

Anti-Nightshade Diet + Kale Chips!

Its the first day of my anti-inflammatory eating month!

Although I am normally strict with my diet, I sometimes lack in cutting out foods and spices which cause some of my flare ups. Foods in the 'nightshade family' like peppers, tomatoes, paprika, potatoes, chilli and aubergine. These foods are known to cause pain and inflammation in people with arthritis, due to them containing some drug-like substances. One of them being, Solanine  - this can cause paralytic like muscle spasm, aches, pains, tenderness and stiff body movements in some people, creating more problems for arthritis patients. Many have been been cured purely through a anti-nightshade diet with the help of going gluten-free too!

I will be finding foods that help naturally with inflammation -  these can be good with helping anyone, not just people with arthritis or joint problems. Recently my favourite spice at the moment is turmeric - especially good in eggs and omelettes for breakfast. I find that the mornings is when my pain is at its worse, so this is a great way to start my day. All you do is just add a couple of teaspoons of turmeric into your eggs with some black pepper, whisk up and cook in coconut oil. I promise you, its delicious! 

Own Photo - Turmeric Spiced Omelette

So for the next month while I am home from easter, I will not only be gluten and dairy-free but also completely nightshade free! It is going to be tough as I do love my peppers! 
Hopefully I will come up with lots of anti-nightshade and anti-inflammatory recipes which are still just as exciting and tasty! 


Kale Chips!

Being dairy-free means I have to find my calcium in other foods, kale being one of these. Although its not a direct comparison to milk, it is worth noting that kale has 150 mg of calcium per 100 grams, while milk has 125 mg. 
Lots of people either stir fry kale, steam it or whizz it up in a 
smoothie - I personally prefer and think it is easier to digest as kale chips! 

Own Photo - instagram.com/mollybuszard

You will need:

Bag of Organic Kale (make sure that you wash it)
Three Tablespoons of Coconut Oil (Melted)
One teaspoon of Paprika (Optional - not so good for an anti-inflammatory diet)
Salt + Pepper

Preheated Oven at 180 degrees (Fan)

In a mixing bowl add the washed kale and the melted coconut oil.

 (I like to melt my coconut straight onto the baking tray in the oven or in a bowl over boiling water - this keeps all the nutrients in the oil rather than microwaving them out!)

Add the salt, pepper and paprika and mix with your hands - making sure all of them are coated with the oil mixture!
On two baking trays, evenly spread out the kale chips so that they all cook at the same speed. Put into a preheated oven at 180 degrees for around 10-15 minutes, or until they start the chips start to get crispy and brown!
Serve straight away hot as a side dish, or put into sealed bags and have as a snack later or the next day!


I have also done this same recipe with butternut squash, carrots, parsnips and apples - using my spiraliser on its ribbon tool!
These make great fruit and veg crisps - you just add different spices to mix up the flavours, like rosemary or cinnamon! 
These are a great healthy snack that is super easy to make!


Own Photo - Butternutsquash Chips - instagram.com/mollybuszard


Enjoy!

MB

X


Saturday, 14 March 2015

Bone Broth

Health and Diet is now more than ever a huge topic in todays society. We are surrounded by articles, magazines and posts on social media sites telling us what is best to eat and do. The most commonly used word I see is 'superfood'.
I never really use the word 'superfood' due to the fact I don't believe they are actually that 'super'. What I mean is, that these are the foods we should be eating everyday. They aren't super due to the fact they should be known as normal foods that everyone eats because they are so beneficial for us in so many different ways. The name 'superfood' is a marketing ploy for certain companies to sell their products. Instead of buying into the brand, we should be making and creating our own foods that are helping us feel great, healthy and maybe even, dare I say it - super

For me, I look into foods that help my digestive system, this then aids in helping my arthritis. These are normally foods that cause an anti-inflammatory response.

Duffle (my puppy) getting jealous of my bones.
Bone Broth is great for healing the gut, this is due to the gelatin in the broth that helps with digesting nutrients. The amino acid glucosamine is also produced which helps to stimulate the growth of new collagen to help repair damaged joints as well as reducing pain and inflammation! 
When I recently have praised bone broth for how tasty it is as well as being extremely beneficial, a lot of people have turned their noses up. But I can guarantee that once you have tried it, you will see what all the fuss is about. 
It is great on its own - hot in a mug or, heated up with lots of vegetables in, creating a posh pot noodle. Whether you stir through meat, poach eggs in it, boil rice noodles or simply use as a base for a soup, its great to have in the fridge ready to use or even in the freezer for whenever you need it. 
My favourite so far is shredded cooked chicken, spiralised courgettes and carrots, coriander and some ginger - delicious!


What You Need:

Chicken Carcasses - I used 4/5 as I was making a big batch, but how many you can get your hands on. I went into my local butchers 'Newitts of Thame' and they kindly gave me a bagful. 
2 Tablespoons of Apple Cider Vinegar
2 Cloves of Garlic
One Onion
One Lemon
Salt and Pepper
Water - the amount will be different depending on how many carcasses you have. The water should be about an inch above the ingredients.


In a slow cooker - or pan on a hob. Add in the chicken carcasses and pour water over until it is covering the chicken. It should be a little above an inch over the chicken.
Chop the lemon, garlic and onion - doesn't have to be neat as this is all just for the flavouring.
Then sprinkle the Salt and Pepper to season.
Bring everything to a boil then put onto low if you are doing it in a slow cooker - or the smallest flame on the hob. It needs to be the lowest it can be, so it can gently simmer for a long time.

It should be left for in-between 12 and 24 hours. The longer the better as more flavour will come out as well as lots more nutrients. You will know when it is ready as the bones will start to crumble.
Once it is ready, pour the broth through a sieve so you are left with just the liquid. Put into containers to either have in the fridge or freeze so you can use later on!


Be inventive with adding in different ingredients and spices! Its a perfect base for lots of different recipes, and a quick pick me up that is so good for you too!


Enjoy!

MB 

X


Monday, 9 March 2015

Two Years On....

This time two years ago, I was diagnosed with Seronegative Rheumatoid Arthritis - (I didn't really have much knowledge on what it was, especially as before I was diagnosed, I had spent my life calling it 'arthuritis'....) But I knew that I felt pretty shitty about the situation. It was prior to the Easter Holidays and I was about to go on a skiing trip. (not such a good idea, going somewhere wet, cold and doing pretty intense exercise...) 

Poor Circulation - (a symptom of Arthritis when its cold and damp.)
Anyway, I had been injected with some steroids to ease the pain off for a while, although it meant that the pain came back pretty badly when I returned to University. After spending a bit of time struggling and feeling sorry for myself, I decided it was time to take a positive outlook on the situation. I researched a lot online about natural remedies, diet, fitness and nutrition helping with auto-immune diseases. If it wasn't for my boyfriend Edd, pushing me to look into this, I don't think I would feel as happy and healthy as I do today. But I like to think I have probably made it up to him by the endless supply of foods and meals that I cook.

Anyway I never created this blog to write pages on the pain I'm in or to make people feel sorry for me, because I am actually doing pretty good at the moment! 
I am just hoping that more sufferers of autoimmune diseases realise how important diet and fitness is, as well as perseverance and positivity throughout! 
I also hopefully have some more exciting things lined up for  my blog, but we will have to wait and see!

As we are now in Spring, here is one of the prettiest treats I have made.
The recipe is inspired by Deliciously Ella's book! An amazing gluten/dairy free treat of Raspberry and Blueberry Scones, perfect for a Sunday - or even mothers day next weekend!

Own Photo - www.instagram.com/mollybuszard
You will need:

One cups of Buckwheat Flour
One cups of Ground Almonds
1/2 a cup of Dairy-Free Milk (Rice Milk, Almond Milk, or Coconut Milk)
Two Tablespoons of Maple Syrup or Honey
One 1/2 Tablespoons of Apple Sauce (I use a baby food apple puree - no sugar, dairy or gluten!)
Sprinkling of Salt

Handful of Raspberries
Handful of Blueberries


Add all the ingredients accept the berries into a mixing bowl, and whisk/mix until smooth. Chop or crush the berries slightly and then stir them through the mixture. 


On a baking tray, line with parchment paper and grease with some coconut oil. Dollop on large spoonfuls, shaping with a spoon to create scone like shapes. Pop into the oven at 180 degrees, or 160 degrees for fan, and bake until golden brown for around 35-40 minutes.

Own Photo - www.instagram.com/mollybuszard

I had mine warm with some fresh mint, raspberry jam and dairy-free ice-cream! Yum!


Enjoy!

MB

X

Wednesday, 4 March 2015

Avocado Chocolate Chip Cookies


Had a little article written about me and my blog today, in my online local newspaper! http://www.thametoday.co.uk/news/rheumatoid-arthritis-sufferer-21-manages-her-symptoms-with-food-1-6613706


http://www.thametoday.co.uk


Which got me thinking about how I started this blog over a year ago. This was due to me deciding to take a positive outlook on my arthritis diagnosis, and find a way to help towards managing my pain. Its not just to help me, but also for other people, especially of a younger audience, to feel that they aren't alone. Arthritis and IBS are both known as 'invisible illnesses' as from the outside we look healthy and well, but most of us will be struggling without you having any knowledge. 
Posting on this blog helps to keep me motivated and positive.  I'm lucky to have people supporting me, so I hope that some way or another, I am supporting others!
Keep liking and sharing and especially, enjoying reading me blabbering on about food! 


MB

X


www.instagram.com/mollybuszard


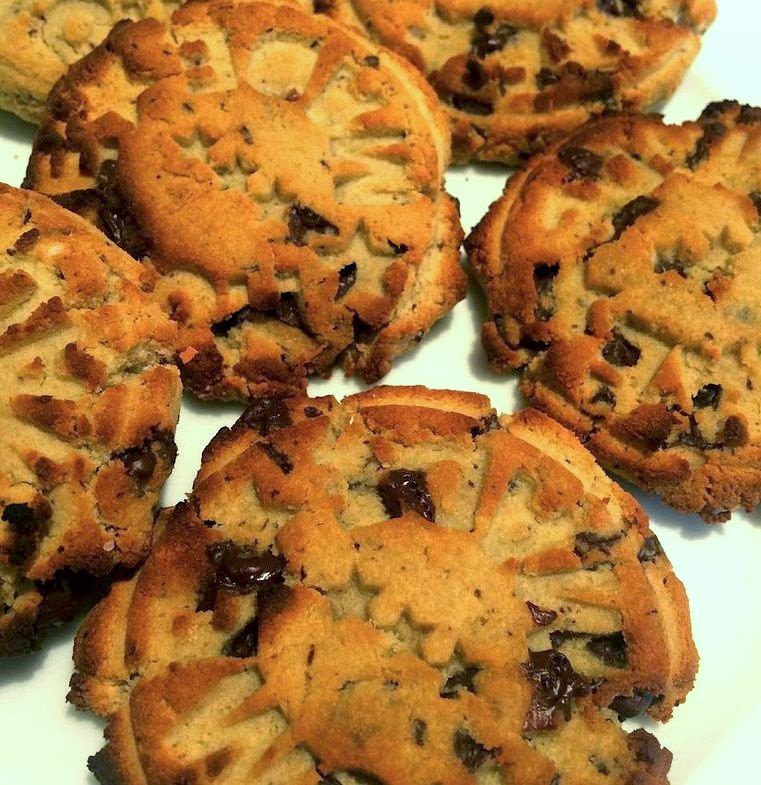
These cookies are the fluffiest gluten-free ones I have had, and taste almost like the real thing! 
In baking, avocado is a really good replacement for butter, especially if you are dairy free. Avocado is one of the many 'good fats' that is packed full of vitamins and minerals, unlike some saturated fats.
I normally cook these on a Sunday as one of my treats at the end of a healthy week. (They are normally all gone in the same day!)


You will need:

One Cup Coconut Flour (GF Flour)
1/4 Teaspoon of Baking Powder
3 Tablespoons of Coconut Oil (Melted)
One Teaspoon of Vanilla Essence
1/4 of an Avocado Mashed
2 Tablespoons of Maple Syrup/Honey
One Egg
85% Dark Chocolate - (Broken into Chunks)
Sprinkling of Salt


In a large bowl, add the flour, baking powder and salt and mix together. In a smaller mixing bowl, add the melted coconut oil, avocado, vanilla essence, maple syrup/honey and mash together. Pour the wet mixture into the dry mixture, adding the egg in also. Use a handheld mixer or whisk (if you are feeling strong!) to create the cookie mixture. Break the dark chocolate into chunks and stir them through the mixture. It may seem quite dry and doughy like, but this is what makes the cookies so fluffy! Remember there is avocado in the mixture, hence why it may look a little on the green side! 
Roll the mixture into balls and flatten with your palm on a baking paper lined tray - however big or small you want your cookies depends on your preference. I have a 'homemade' cookie stamp that I used to flatten mine out, which is how I got the effect on mine.

Pop them into the oven at 180 degrees for around 10-15 minutes, or until the edges are firm.
I just add chocolate chips, but you can add in dried fruit or nuts too!


www.instagram.com/mollybuszard


Enjoy!

MB

X

Monday, 2 March 2015

Sweet Potato and Parsnip Chips


Another month has flown by. A new month is always a good reason to start eating or being healthy, and with the recipes on my blog, it shows that it doesn't have to be tedious, boring, difficult, time consuming or expensive.

Yesterday I went to the BBC Eat Well, Good Food Show in London. Hemsley and Hemsley, two sisters who cook healthy food together, gave a really good talk. It made me immediately want to get home and experiment, but instead we went to Whole Foods! (That place is my idea of what Heaven looks like!) 
Anyway, they spoke of the importance of FATS, how much our body needs them, and how what we put into our body impacts on the way we look, feel and get through the day. I totally agree!
I'll repeat it again and again to people but, FATS don't make you FAT. 
and while I'm at it, if you're a girl - lifting weights won't make you look like Arnold Schwarzenegger. 


Although Cupcakes are still good....


I find with eating healthy, its temptation that you really have to try and control. The smell of fish and chips on the way home, or the dairy milk bar looking at you while your paying at the till. Whatever it may be, fighting it is hard. But there are other options which taste just as good and wont make you feel as guilty. 
Although please don't live your life by never going out for meals, or eating only a square of dark chocolate once a week. The only way in which your body will thank you, is through the enjoyment of eating. Don't stress over if you had those fish and chips or, that bar of chocolate. It won't do you or your body any good if your inflicting stress.

Sweet Potato and Parsnip Chips, are something now which I actually enjoy more than normal chips. They are better for you as they are more nutrient dense and have a sweeter nicer taste. I have finally perfected the recipe to get them just right! 


You will need:

Two Sweet Potatoes
Two Parsnips
Three Tablespoons of Coconut Oil
Two Teaspoons of Paprika
Sprig of Rosemary
Sprinkling of Sea Salt and Pepper


In a bowl over some boiling water, melt the coconut oil. (You can also do it in the microwave but that takes out a lot of the good nutrients!) While the oil is melting, you can cut your sweet pot's and parsnips. Leave the skins on, and cut them into equal size chip shapes. Have them so they are a bit chunkier and more wedge like, so they cook evenly and crisp up.
In a mixing bowl, put the chips in and pour over the the coconut oil. Add in the rest of the ingredients and mix with your hands. Put the chips onto a baking tray, you will probably need two. Spread them so that they are evenly laid out and none are on top of each other. Pop into the oven at 200 degrees for around 30-40 minutes, turning them over half way through. Depending on your type of oven, they could be done sooner or later. Once they are crispy on the outside and soft in the middle you know they are done!


Serve as a side dish, or on their own with some mayo.
I normally have them with chicken wings or my Pulled BBQ Chicken: http://mollybuszardfood.blogspot.co.uk/2015/01/pulled-bbq-chicken.html


Enjoy!

MB

X